This blog is Moving

This blog has changed back to blogspot Papillon Digital Design and the new link is https://papillondigitaldesign.blogspot.com/

Welcome

Welcome to PapillonDigitalDesign. Hope you get inspired by the projects, videos and files. Would love it if you could leave comments and become a follower. (Word verification is turned ON to avoid spam. Sorry for that inconvenience.) Would love it if you would also share your project here . Due to the fact that the blog has moved there maybe some broken links. Please try deleting the s after designs from the broken link and try the link as the new link is http://www.papillondigitaldesign.com/ Thank you for visiting.

Saturday, November 5, 2011

Scrap it Saturday - Fun with embossing and a giveaway

Hello Everyone.
Join me for Scrapping on Saturday.
Let's explore techniques, software on scrapping and make papercrafting items.
Today I decided to do some embossing!
I love embossing! Something about seeing the powder change when a heat gun is applied really appeals to me and is so fun to watch.
The card for today


The cardstock is bazzill cocoa. The pattern paper is K&Company ancestry stack. envelope is bazill which fits 5 x 7 card. The base card is cut 4 & 3/4" X 12" to fold to 4 3/4" x 6 and the pattern paper is cut 1/4 inch lesser. I kept all the remaining pieces and reused then for envelope flap and punching flowers etc. Punch for envelope is MS punch. I used spell binder shapebilities to cut the doily and stamped with versamark using MS doily stamp. The nestability/shapebility I used was floral motif. Though the design was cute since it is not a nestability I got quite a bit of jump between 2 layers and had to use a scallop nestability for another layer . You can see the pink shimmer dcwv cardstock. The embossing powder is zing copper. The sentiment on the inside is from paper trey inc. I used a ribbon  I had got from HL. I distressed the edges of the pattern paper using Tim holtz distresser and inked using dew drop rich cocoa.
Here is the video. (I am uploading it and it might not appear immediately)


I would so love it if you join me and make a card or layout of using embossing and post it in the linky below.
Now for the giveaway. Tomorrow is my birthday and so  what better way to celebrate than a giveaway? I will be giving away a nestability


 & a Martha Stewart Doily stamp


to one lucky winner. To win you must be a follower as I would like to see the blog grow) and also leave a comment in this post.

 I would so so love to see your project using embossing. Does not matter if you made it today or days back. Do post your embossing project in the link below.
Also be sure to drop in on http://www.thebugbytes.com as there is another giveaway there

post signature

Friday, November 4, 2011

Bob to the Top

Hello
This is Pam from Sassy's Design Team. Thank you Sheila for having me here as your designer today.
If you dropped in last week to my blogs (Papillon Digital Designs & The Bug Bytes ) you would know I was organizing all my stamps and cleaning up my scraproom - lol in fact my whole house needed cleaning. I found some things like corks and a packaging spongy like paper thingy which came with close to my heart stamps etc and  decided to recycle/use them in a project.


I have fallen in love with kraft paper  - Recollections. The other paper is from K & Company - I think the designer pad. Some chalk inks, staz on - black ink, stamps - yep after all the organizing gotta use them don't I ? and nestabilities - scallop and of course some tinkering with AI to create my own text (don't know what I was thinking when I typed that in but lol that's what came to my mind when I saw the cork :) ) I was set to make my card. The font is Bauhese free font and the flowers from some other font. You can click on the image and print it out if you like it.

Oh and some Ribbons. Yes the big wide costco ribbon and another smaller one from HL which so looks like the costco one.


I just traced a walmart cup rim onto the cork and cut it with scissors. It is about 3.5 inches. Then I stamped a doily shape onto the white spongy thingy with staz on ink and cut that out too. You can't see the print too clearly here but you can when you see it in person. A MS flower punch on a scrap piece. Then the wired costco ribbon comes in so handy as it retains the fold shape easily. So fold the ribbon in a rosette shape and glue it on. Some bling and some sharpie on the cork and the rosette is ready. The kraft paper I cut it 12" x 6" and the k & company paper to 5" x 11.5".


The inside of the card


This is for Dayna and Carole and Jeannie - my design team members. I used layers and pop dart. I do layer but left to myself I would have just stacked - 1 white scallop (label) on the brown. But nope these ladies especially the first two made me do it - well not made me but encouraged me/egged me on to do this - stack like this.


I have told them I will do this on solid cardstock or printed out things but nope not on my lovely stack of patterned papers. As it is each time I use these stacks - it's like pulling out my teeth :).
So that's my card. Recycle some of your things - make a project and show us what you have done and post in the linky below
And Be sure to drop in tomorrow at the TheBugBytes . I have a surprise.


post signature

Sunday, October 30, 2011

Stamp Organization

The last 3 days I spent time on organizing my stamps. I had it previously in cd cases which I kept in the ikea cube (plastic cube drawer). I found it difficult to search and some of the other stamps were too big to fit in the cd cases. So I decided to change.
Now since I had already organized once before my rubber stamps were already off the wooden block.
I usually microwave the rubber stamps for 12 secs and then immediately remove the stamp with the foam which comes off easily and sticks to block. If the foam is cheap and tears then you can always remove completely and mount it on EZ mount. I also remove the decal on the top and paste it on cd.
Now as to how I organized
I used transperencies to stick/cling the stamps on - one side to stick the stamps and the other side I stamped if there was no decal or image so that I know where the stamps go on.
Then I slipped the whole sheet into a sheet protector and placed/filed them into a ring binder. I used 3 " and 2 " binders


Now I can easily flip and get to my stamps easily.
And next week I am going to organize my cuttlebug embossing folders
I think I am getting some of these 5 x 7 protectors - for regular ring binder -  http://www.amazon.com/gp/product/B000WA8S48 .

So how do you organise your stamps. Do share and post in the linky below


post signature

Make the Cut works with Cameo

Yeah! I just read Make the Cut works with Cameo!
For more details http://underacherrytree.blogspot.com/2011/10/silhouette-cameo-review-4-how-to-cut-to.html
I know the process is a bit more and tedious the first time. I prefer using silhouette designer studio as it is easy. But the more options the better. And easier to jump through many machines when you have a common software
And if you want to know more about cameo and silhouette do join the silhouette MB - http://s15.zetaboards.com/Silhouette_Plus/index/. It's such a great resource

post signature

Friday, October 28, 2011

Texturize & Embellish!

Hi
This is Pam from Papillon Digital Designs & The BugBytes. Thanks Allison and Caroline for having me on as a guest designer today at Paper Crafting Weekend Challenge.
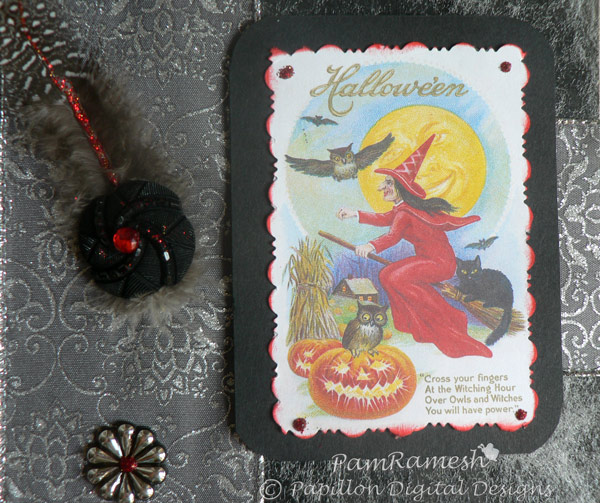
Today's challenge is to use the things around you maybe the spider webs you got to decorate your home for Halloween (like I have done here) , spiders anything even ribbons or buttons to embellish your project and add texture.
Here is my card


I have used a plain black cardstock, silver wired ribbon (which I got from Costco - isn't it pretty?) , some buttons, a feather and the central image is from Dover publications - Greetingcards - which I printed out and cut out with some decorative scissors. I love Dover images.


Then I took a bit of cobwebs we get at store for decor and applied it to the cardstock. It looks better if you xyron or dilute tacky glue with water and apply with a foam brush allow to dry  and then stretch out the spider web. Using ATG gun or tape leaves some marks which can be seen otherwise.

Here's a close up of the spiderweb


 After applying the spiderweb I then added the ribbon (like a cross). Then I took some buttons and further embellished them with rhinestones and stickles and placed 2 buttons on the ribbon with glue dots. Then I took a feather and attached that and placed the center button. The rhinestones and stickles were added to bring some of the color from the image into the card else I felt it would stick out like a sore thumb.
 I inked the image - matted it with black cardstock with corners rounded and then glued it with foam dots onto the card


As for the inside of the card I used the CTMH stamp on white cardstock. Again cut it out with decorative scissors and inked with red ink and added some stickles and then glued it on to the inside of the card with foam dots. I just placed a bit of silver ribbon to give pop


And that my friends is my simple Halloween card embellished with things to add a bit of texture. Now you can even give an illusion of texture for e.g I could have taken the spider web spread it around and then sprayed with paint (mist) or glimmer mist and the web would have acted as  resist and could have got the texture of the web. So do play and add texture or give an illusion of texture and post your project for all of us to see. Thank you for having me as a guest designer once again Allison and Caroline. And readers thank you all for patiently reading this post. I look forward to see your project at http://papercraftweekendchallenge.blogspot.com/2011/10/texturize-embellish.html
 Happy Halloween!
Pam
-

post signature

Wednesday, October 26, 2011

Happy Deepavali

WISH YOU ALL A VERY HAPPY DEEPAVALI
Today is our festival of lights called Deepavali  - Deepa means lights.


To read why we celebrate you can find some info at http://en.wikipedia.org/wiki/Diwali though this does not cover everything as each community/region has their own version of the why's .
What it means to us is new dress, lots of sweets and savories, fire crackers and lights/lamps - lights for the season  starting from today for a month till we reach another festival called karthikai.
WISH YOU ALL A VERY HAPPY DEEPAVALI once again

post signature

Saturday, October 22, 2011

The Silhouette Cameo - Opening the Box

Yeah! My cameo is here.
Love it.
Had to make a video of course!
Remember if you want new images if your studio is already installed you can go to file - preferences - advanced and then click on reinstate the initial 51 designs and you get cool additional images


I need to mention one great great resource other than  the blog and yahoo group  is the silhouette Message board formed by some members http://s15.zetaboards.com/Silhouette_Plus/index/
Do join in there.
Also there is a blog hop going on So do drop by http://www.thebugbytes.com/2011/10/fall-halloween-blog-hop.html and leave comments to enter giveaway. Do play and post your link to your project in the linky.
A sneak peak


post signature