I used Darice embossing folder for embossing the silver miri board and a cricut embossing folder to emboss the black cardstock. The stickers are all from Jolee's Boutique. It is a quick card to make. Ready in a jiffy
Top Menu
This blog is Moving
This blog has changed back to blogspot Papillon Digital Design and the new link is https://papillondigitaldesign.blogspot.com/
Welcome
Welcome to PapillonDigitalDesign. Hope you get inspired by the projects, videos and files. Would love it if you could leave comments and become a follower. (Word verification is turned ON to avoid spam. Sorry for that inconvenience.) Would love it if you would also share your project here .
Due to the fact that the blog has moved there maybe some broken links. Please try deleting the s after designs from the broken link and try the link as the new link is http://www.papillondigitaldesign.com/
Thank you for visiting.
Thursday, June 16, 2016
Friday, June 10, 2016
Anniversary Card
This was a card I made for my wedding anniversary a couple of months ago.

I played with the Tattered lace melded dies. I just love these dies. They have texture frames everything built in. This one is the melded roses I think.
I just colored in the roses with my copic. I cut out the sentiment with a spellbinder labels die . Sentiment was printed out using photoshop. Popped up the melded layer with foam dots. Added a lace trim and placed the sentiment die cut in the center. Some roses and bow to finish it up.
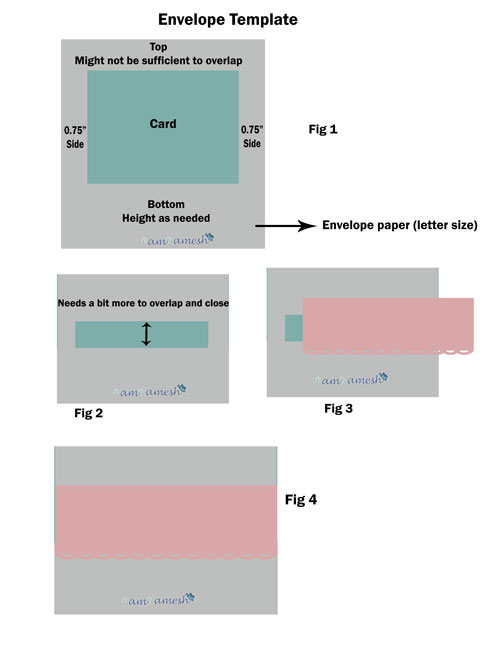
Made a matching envelope. I have shared how I make envelopes in one of my previous posts I think. But essentially what I do is fold up computer paper around the card (after leaving a margin of about 1/8" or 1/4" ) as much as I want at the bottom and about half to three fourth inches on both sides. In most cases the top won't be enough and so it most probably won't overlap to close. To make up for this I cut a piece of paper that matches up the card to the height I need for overlap plus some so I can punch or die cut a beautiful edge. Then paste that so that I can finish up the envelope.
Here is a picture of that and I also have added the same picture as pdf file under misc tab called "pdf for envelope template" so that you can download and print it out if you want.
Note that is not to dimension but just a reference
Hope you liked the card. Thanks for reading.
Posted by
papillon digital design
at
11:13 AM
0
"kind encouraging and inspiring words"
Labels:
Tattered Lace
Monday, June 6, 2016
Happy Summer - Lawn Fawn
Today I made a simple card for summer for Design with Sassy facebook group.
Theme - Summer or using Sun.
I have used Lawn Fawn set "Happy Summer" ( Ants , watermelon and sentiment).
The grass is impression obsession die I think. The sun was a circle punch and Mcgill flower punch combined together. Used copics to color them all. Hope you all play along . If you do make a card please link up the blog post in comment below and the design with sassy facebook group.
Posted by
papillon digital design
at
4:54 PM
2
"kind encouraging and inspiring words"
Labels:
Lawn Fawn
Wednesday, May 18, 2016
DS4J Facebook Challenge
Made a simple card with Digistamps4Joy image for DS4J facebook challenge for month of May.
I have used spellbinder lattice die and also crafters companion edgeables die.
The other image is from Debbie Moore cd's cottage retreat I think. The sentiment too is from that collection.
For a change, I colored using watercolor pencils. Kept it very very simple. Not enjoying coloring much these days because of slight blurry vision.

I have used spellbinder lattice die and also crafters companion edgeables die.
The other image is from Debbie Moore cd's cottage retreat I think. The sentiment too is from that collection.
For a change, I colored using watercolor pencils. Kept it very very simple. Not enjoying coloring much these days because of slight blurry vision.
Monday, May 9, 2016
Mother's Day Card
Hello folks
I am back to crafting slowly.
One of the first cards I made was for mother's day. Recently I indulged in some Anna griffin , Tattered lace and tonic stash.
Here is a card I made for my mom.
The dies are tattered lace. The main rose die is Tattered lace charisma climbing rose. It comes with a dvd with both background pattern papers and the main image which can be printed and cut out with the die.The only problem with the dvd is that the image and papers are all in UK size A4 which is around 8.25" x 11.7' . So either you have to choose A4 as size to print which might get the image clipped. I got the image onto photoshop to print. The sentiment is also a die from tattered lace and so is the flourish behind the rose. The lovely lace is from my stash, I think that was from walmart.
Please do share your mother's day projects in the comments with link to your blog. I would love to see them.
Thank you all

I am back to crafting slowly.
One of the first cards I made was for mother's day. Recently I indulged in some Anna griffin , Tattered lace and tonic stash.
Here is a card I made for my mom.
Please do share your mother's day projects in the comments with link to your blog. I would love to see them.
Thank you all
Friday, May 6, 2016
Blog and domain change
Follow my blog with Bloglovin
Hello folks
Sorry that I have been MIA for some time. Had lots of health issues . Recovering slowly
Just wanted to let you know that there have been some changes with the blog address and domain.
the s after papillondigitaldesigns has been dropped . It is now http://www.papillondigitaldesign.com/ . There maybe some links broken because of this. Please try dropping the s and giving it a go.
I'll slowly try fixing the broken links.
Thank you for understanding

Sorry that I have been MIA for some time. Had lots of health issues . Recovering slowly
Just wanted to let you know that there have been some changes with the blog address and domain.
the s after papillondigitaldesigns has been dropped . It is now http://www.papillondigitaldesign.com/ . There maybe some links broken because of this. Please try dropping the s and giving it a go.
I'll slowly try fixing the broken links.
Thank you for understanding
Wednesday, June 3, 2015
Melting Perler Beads
It's been a long time since I last posted. Have not been crafting for a while.
But hopefully will be back at it soon.
While restocking my supplies I fell in love with the enamel dots I saw in the stores. But thought they were a bot expensive. I came across some videos in youtube and posts in blogs about melting perler beads and pony beads.
I haven't melted pony beads yet as they are supposed to smell a bit and didn't want to melt them right now. Will wait for a day when nobody else is in the house .
But I did melt perler beads.
I got a bucket from amazon of mixed beads.
My first attempt was a disaster ! My toaster oven is toast I think. It did not melt the perler beads down propely. I kept adding mins as they wouldn't flatten down and by the time they did flatten they were ugly. I just dumped them.
Then I decided to proceed to regular oven.
And my 2nd attempt - yeah success
The temperature details are below
In regular oven (not the toaster oven) at 350 degrees for 20 -30 minutes or until completely melted to form a dot.
- Black and white beads take longer to melt. I kept the temperature same but increased the time to 30 mins.
Lighter colors less and darker colors more
After the initial success I decided to melt more beads but after sorting them out by colors.
I melted more colors and then I decided to get more perler beads from amazon - the striped ones. The package came with striped and pearl variety and here I stuck a glitch.
When I melted the pearl variety they left a dot in the center (like the ones we get in the skittles )
I tried with a bit higher temperature and leaving it longer but nope the same result.
Then I noticed that while melting one of the perler beads had fallen down sideways ( we have to keep them upright usually ) and it had turned out cute though it was oval and not round.
So here is my tip for melting specialty pearl perler beads ( as I think striped ones will have to melted the usual way to see the stripes and the hole in center can be ignored) melt it turned sideways.
If you want it round shaped then try cutting them into half ( I havent tried that yet but that might come out ok as then the width of cylinder will same as height).
I melt more varieties and also the pony beads and update in another post
Subscribe to:
Posts
(
Atom
)