This blog is Moving

This blog has changed back to blogspot Papillon Digital Design and the new link is https://papillondigitaldesign.blogspot.com/

Welcome

Welcome to PapillonDigitalDesign. Hope you get inspired by the projects, videos and files. Would love it if you could leave comments and become a follower. (Word verification is turned ON to avoid spam. Sorry for that inconvenience.) Would love it if you would also share your project here . Due to the fact that the blog has moved there maybe some broken links. Please try deleting the s after designs from the broken link and try the link as the new link is http://www.papillondigitaldesign.com/ Thank you for visiting.

Wednesday, August 31, 2011

Flower Foiled!

"Flower Foiled" , " Foiled Flower" or Flower with Foil  :) . Hmm.. last one actually describes what I made but not so catchy as the 1st phrase is it?
So I have got this roll of aluminium foil tape from Home Depot. Since I have not been crafting much I thought I would go up and play to calm myself. Make a craft for the day. And this was the result of my play. Of course this is just the first attempt but I rather liked it. Will do a video of it soon.


Close up


The trick to the process is not removing the adhesive backing too soon!
I took a tape and cuttlebugged it. Take care while choosing a folder as the new large folders do not go sideways inside the cuttlebug. You need an opening to feed the long tape through as you keep moving the tape to cuttlebug on a different part. But I wanted this design and it was on the big folder! So I took a craft knife and slit part of the folder near the joints to allow tape to feed through! If you do not want to cut your folder choose a smaller folder! Or skip cuttlebugging altogether :)
Well then I punched a 1 or 1 &1/2" circle (just grabbed the nearest approx sized punch :) ).
Now DO NOT REMOVE THE BACKING ALL THE WAY! DO NOT or you'll end up with a mess!
just remove a little bit at a time allowing the brown paper to fall behind. ( I do not know how to describe this but if I hold the tape with both hands - cupped ie hands in O shape I use the last 3 fingers to unfold the backing as I go - Hope that made any sense but it is so difficult to describe). Fold/Frill one fold and then remove a little more. I got a bit messy towards the end as I removed lots of backing before I tucked it in.  Then i punched a 1" circle of the remaining foil to adhere on the top to cover the middle. Took some alcohol ink - I think ranger's butterscotch! and dabbed it on with a felt strip/piece. Took a button - cut off the shank and popped it on top with glue dot and voila! a flower to embellish a card or layout with! Hope you liked this and can't wait to try your own. You can also use regular foil and maybe punch out some shapes, optionally cuttlebug them and then glue them and stack them! Play with foils! I have some soda cans too which I want to emboss with my knk.


post signature

Tuesday, August 30, 2011

Glitch in the Silhouette studio software

I have the new silhouette deisgner studio and found a glitch. My old GSD files cannot be moved in the MY LIBRARY from one folder to another. Hopefully this will be fixed soon.
I had a slight problem with the print and cut being about half an inch off after the silhouette made a noise and started cutting elsewhere. I tried switching off and moving the carriage back and forth (as advised by silhouette) and calibrating. Also contacted them by email and they sent me an fix - a file - and this fixed the problem. I have to start making videos soon :)


post signature

Sunday, August 28, 2011

Papyrus Frame

I am going to call this a Papyrus frame


The svg file is available for download under the tab
post signature

Thursday, August 25, 2011

Never Ending Card!

 Did I tell you that my son was fascinated by stars and he wanted another star card. He wanted it on a never ending card! I made the card on my gypsy long ago in my thebugbytes blog using 3 birds - images ie straight from the nest and the card was featured in their blog. You can check that out at this link - http://www.thebugbytes.com/2010/04/never-ending-card-using-straight-from.html . There is a video there as well to show how I assembled it

Just 1 pic of this


So I decided to do a svg file as well for just the base with no embellishments (file under svg file tab - top menu in the blog). My son wanted it blue and with stars - just that.
But before I post the pics the template/instruction to assemble can be seen from these two images


and


So here is a glimpse of the simple simple card I made using the silhouette (silhouette - just the base file is also available ). Looking at this my elder son wants one too but not blue and not with stars but with saxophone images!


1st turn


2nd turn


Now in the next turn  I could have split the images like in my 3 birds version so that half of image does not show through but I wanted the smile to peek through so next turn


and the next turn brings us back to the 1st image. Hope you make one of these cards. You need a big envelope though as my card was the size 8 x 8 :)

post signature

Stars and Heartborder

My son so loves stars now on his cards. So when I was making some thought why not make an svg file . I also played with heart border - I was inspired by watching a crafting video. The files can be found under svg file tab. I like to keep that sorted and if you want to make something it is easy to go to one download page. Please do leave comments if you like the files and also would love it so much if you can share your projects. I will soon have my never ending card svg file out (gypsy file is already available at thebugbytes) today or tomorrow.
Here are pics of the files


post signature

Tuesday, August 23, 2011

Working with the sketch feature in Silhouette designer studio

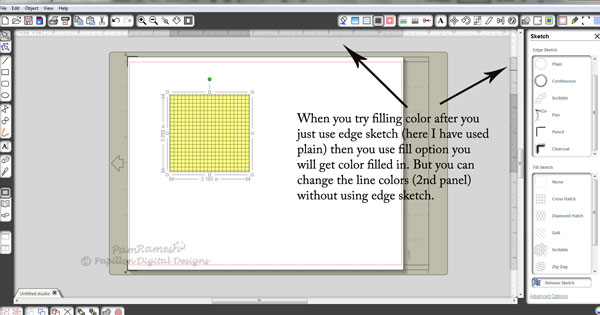
The sketch feature is for sure a fun way to get your own patterns in the fly.
But there is a tiny trick to it. You have to have an edge sketch for you to be able to fill the shape with color.
Else without the edge sketch option chosen you will not be able to fill (paint bucket on the first panel
to the right side top of the screen).
Here are pics


post signature

Importing svg files in Silhouette designer Studio

If you get an error saying file is corrupt in silhouette designer studio then the most probable cause is that there is text in the file. So open svg editor and expand text to path and then you can try opening it and the file will most probably open fine.


post signature